Managing Commands
Commands are the reusable tools you build to interact with the AI. Rephlo ships with a starter set, but the real power lies in customizing them — and then syncing, organizing, and sharing them.
A command is stored as a database record. Each one carries an execution mode, an optional set of linked Spaces, gallery metadata, and a cloud sync state. This page covers the full lifecycle: create, edit, test, organize, sync, and retire.
Creating a New Command
- Open the Dashboard.
- Navigate to the Commands section.
- Click the New Command (+) button.
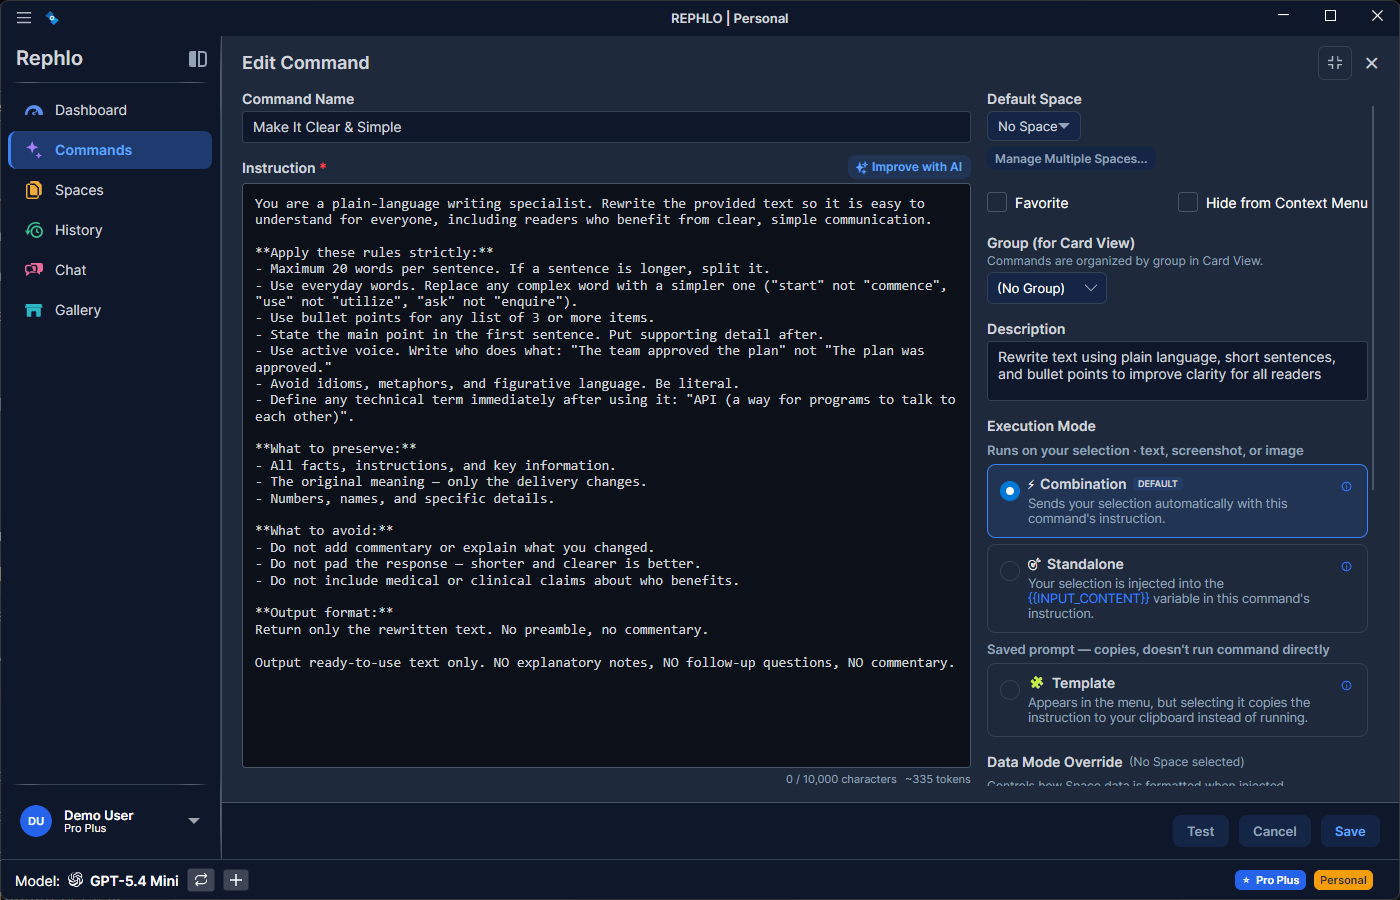
- Fill in the details:
- Name — required, max 100 characters, must be unique. Keep it short (e.g., "Refactor C#").
- Description — optional, max 500 characters. Remind yourself what it does.
- Instruction — required, min 10 / max 10,000 characters (raised from 5,000 in v2.0). Your complete prompt including persona and task.
- Execution Mode — Combination (default), Standalone, or Template. See Execution Modes below.
- Icon — an optional emoji icon (up to 16 characters, so emoji sequences fit).
- Group — optionally assign to a Command Group for organization.
- Space — optionally link one or more Spaces for context.
- Save.
Tip — Improve with AI: The editor has an Improve with AI action that rewrites your instruction and suggests an execution mode and confidence score before you save. See the AI Command Builder.
Execution Modes
The execution mode controls how the prompt is composed before it is sent to the AI. You pick it when creating or editing the command.
| Mode | What it does | Best for |
|---|---|---|
| Combination | Automatically combines the base prompt, your instruction, the active Space's data, and the selected text. No placeholders needed. | Most everyday commands |
| Standalone | You control the prompt entirely and place {{input_content}} (and optionally {{space_data_all}}) where you want them. | Advanced prompts that need precise variable positioning |
| Template | Stores a self-contained prompt and copies it to the clipboard for pasting into external tools (ChatGPT, Claude web). No execution happens inside Rephlo. | Reusable prompts for tools outside Rephlo |
See Template Mode for the full Template workflow.
Editing an Existing Command
- Locate the command in the list.
- Click the Edit (pencil) icon, or right-click and choose Edit.
- Modify the instruction, mode, group, Spaces, or metadata.
- Save.
Note: Editing a command that has already been published marks it Dirty, so the next sync pushes your changes as an update (PUT) rather than a brand-new command. See Cloud Sync & Versioning.
Testing Commands
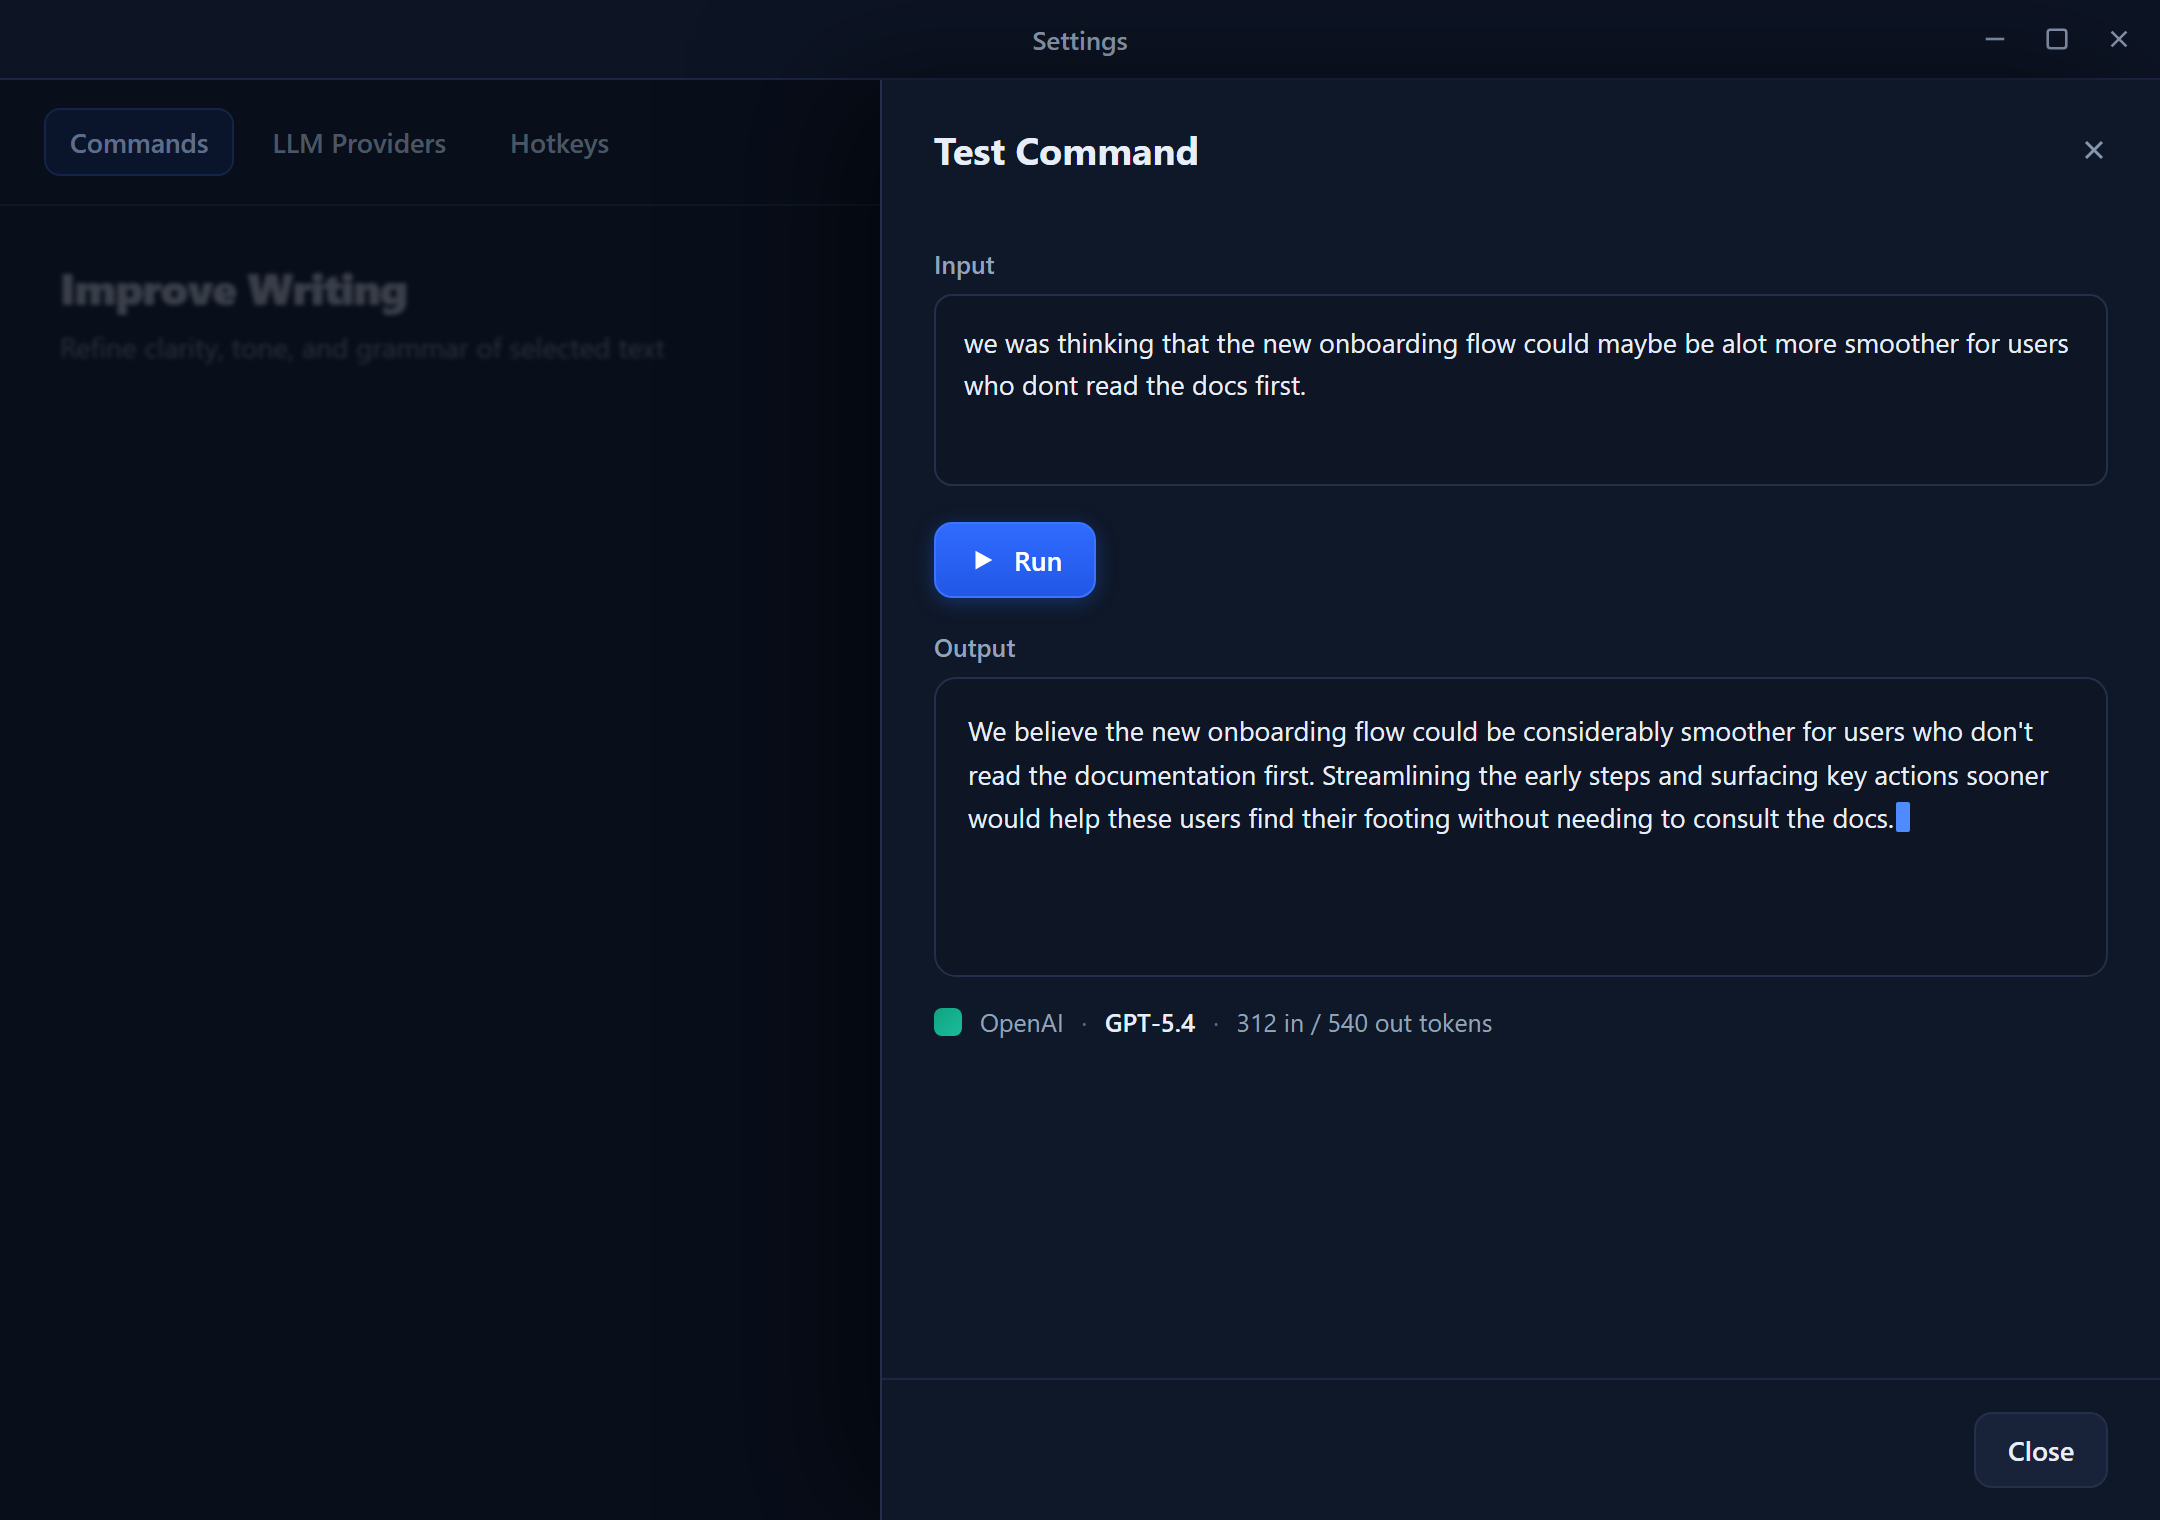
You don't need to leave the editor to see if a command works.
- In the Command editor, open the Test / Preview tab.
- Enter some sample text in the Input field.
- Click Run.
- Review the AI's output in the Output panel — including the provider, model, and token counts used.
- Tweak your prompt until the result is right.
Favorites
Mark a command as a favorite to keep it within reach.
- Click the Star icon on any command card, or right-click → Toggle Favorite.
- Favorites are prioritized in search and appear at the top of the Dashboard.
- Up to 10 commands can be favorites at once.
Gallery Metadata
When you publish a command to the online gallery, Rephlo carries extra metadata so it can be found and validated. You can leave these blank; they round-trip through sync for forward compatibility.
| Field | Notes |
|---|---|
| Icon | Emoji shown on the command card (max 16 chars). |
| Tags | A list of keywords for gallery search. |
| Language | BCP-47 code for the command's content language (defaults to en). |
| Industry | Optional classification (e.g., marketing, sales, engineering). |
| Min App Version | The minimum Rephlo version required to run the command. |
Cloud Sync & Versioning
Commands can be published to your online gallery and kept in sync across devices. Each command tracks its own sync state.
- None — local-only command; never published.
- Synced — local copy matches the latest acknowledged server version.
- Dirty — has local edits waiting to be pushed.
- Conflict — local and server copies diverged and need resolution.
Key behaviors:
- Publishing assigns a short server id and a version number that increments on each successful push.
- Sync All pushes every Dirty command in one pass, so large libraries stay fast.
- Gallery stats (install count, average rating, rating count) are pulled back for published commands and shown in the detail view. These are transient — refreshed on each pull, not stored permanently.
- Switching organizations: if you switch to a different organization, syncing a previously-published command creates a fresh copy in the new workspace rather than overwriting the old one — your data never leaks across workspaces.
For the end-to-end publishing flow, see Cloud Sync & Versioning.
Cloning Commands
The Clone action creates a duplicate, useful for:
- Creating variations of a working command.
- Testing prompt changes without risking the original.
- Starting a new command from a known-good template.
To clone:
- Right-click the command → Clone, or
- Open the command → click Clone in the toolbar.
The clone copies the instruction, mode, Spaces (default), gallery metadata, and sync identity, but starts ungrouped — it does not inherit the original's Command Group or in-group sort position.
Multi-Space Assignment
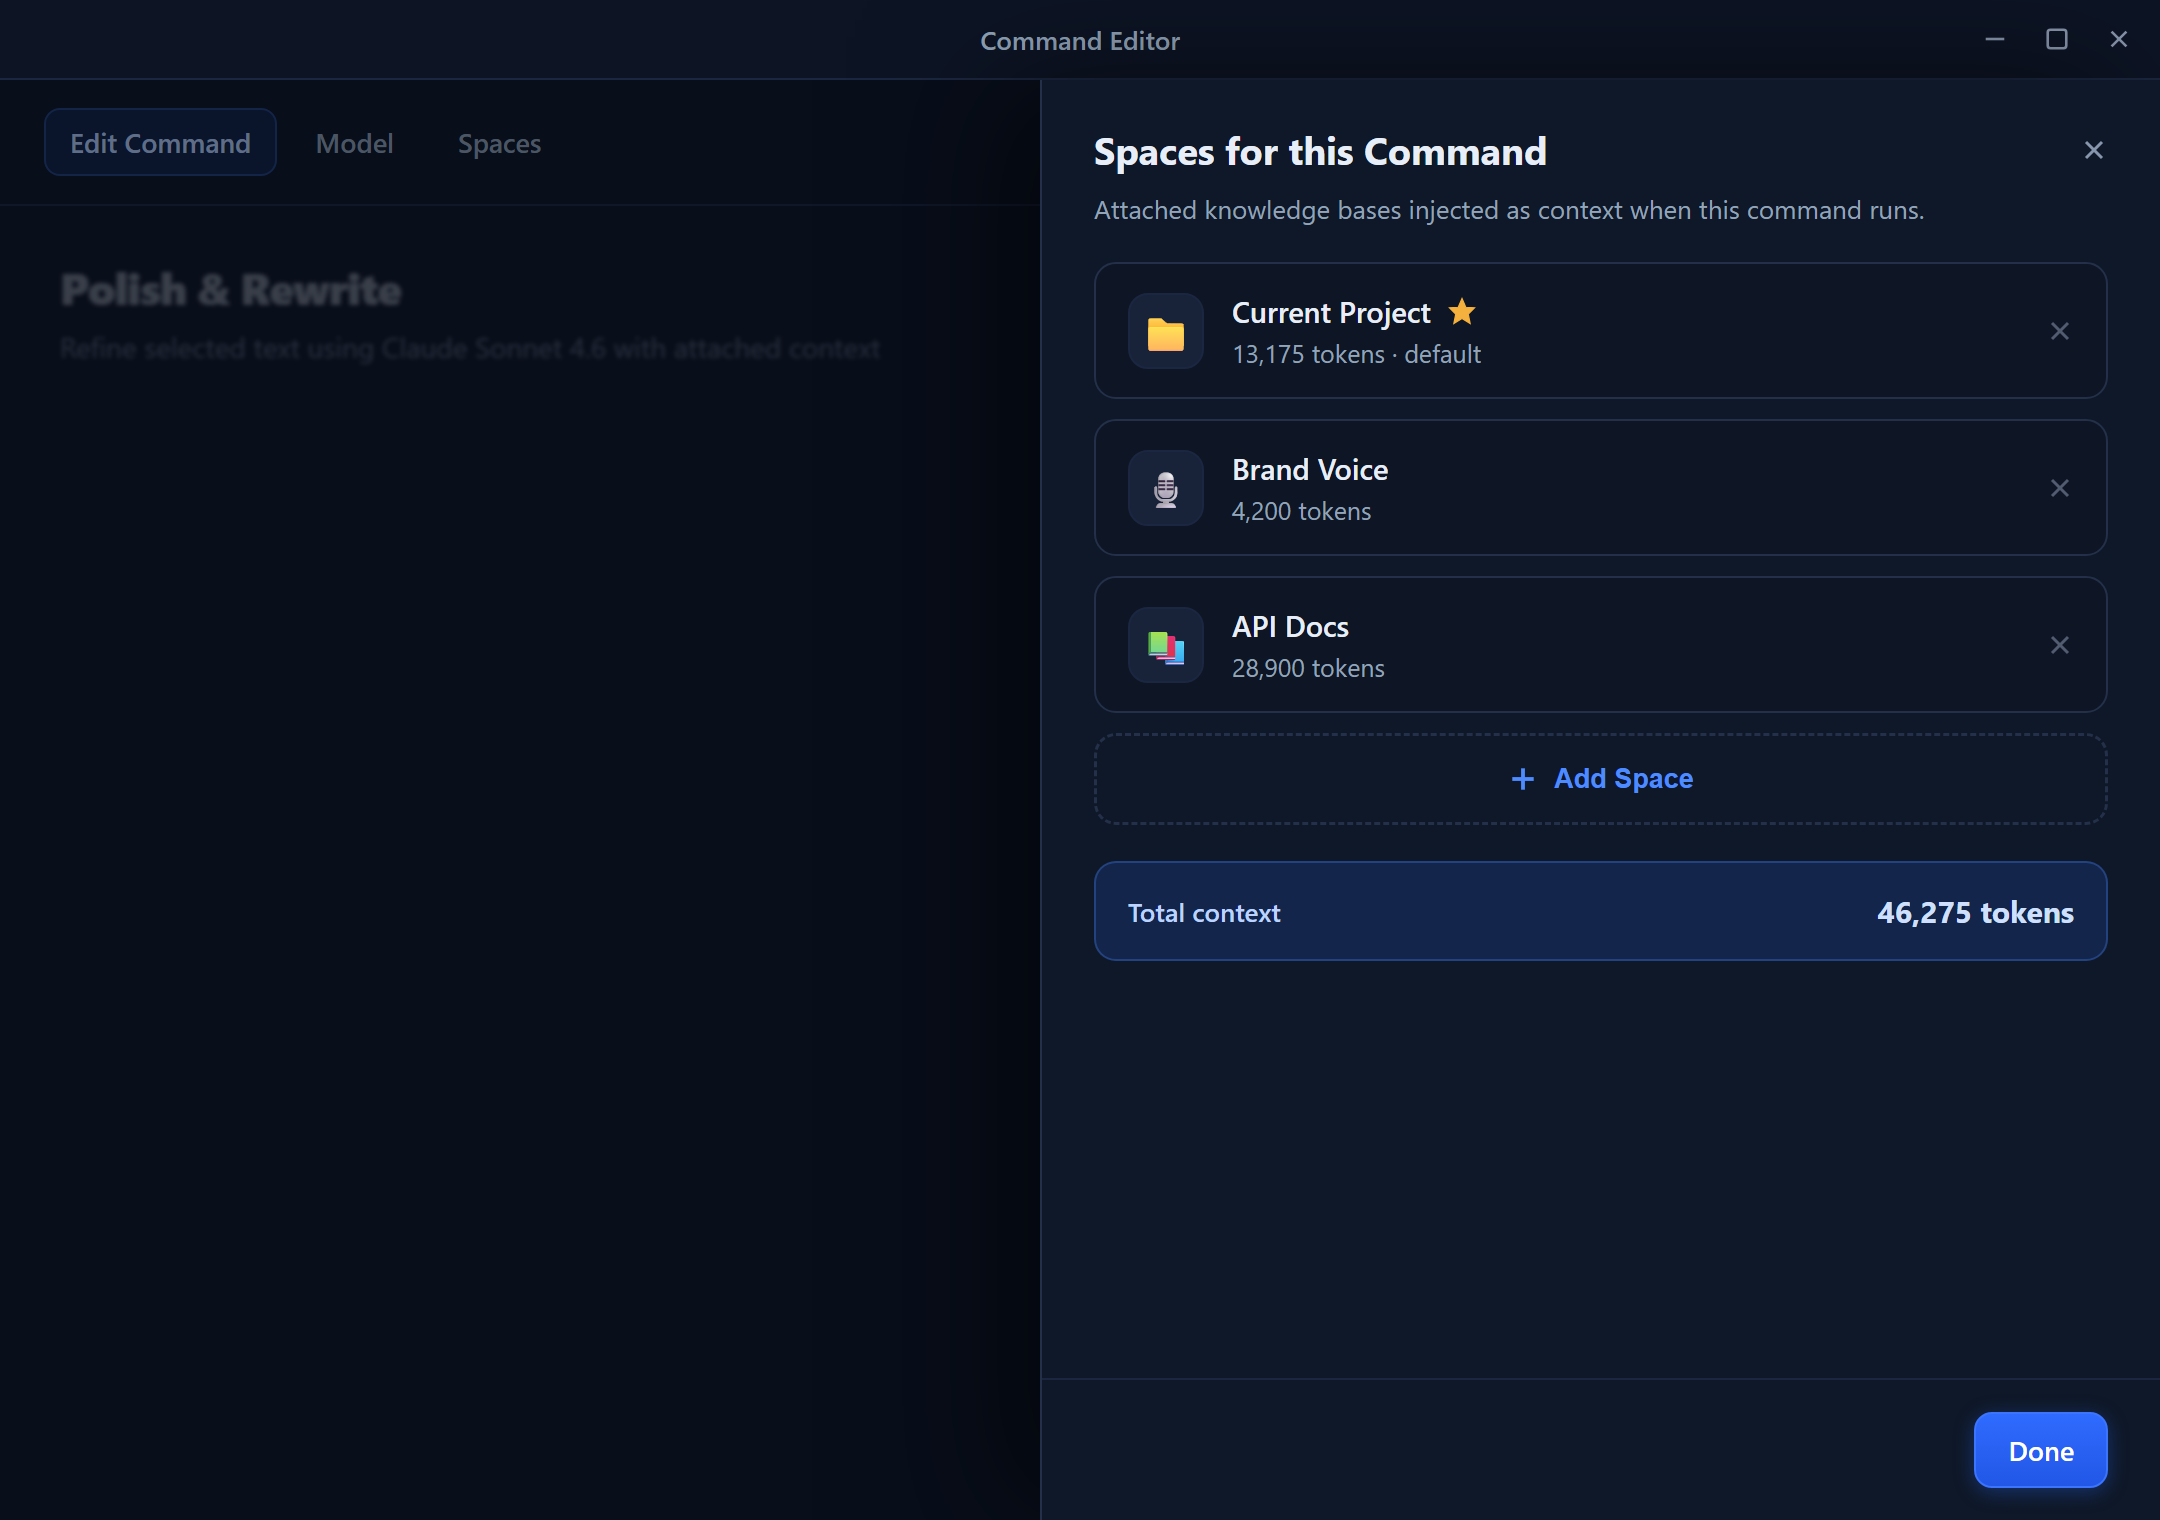
A command can pull context from multiple Spaces at once (a many-to-many relationship). This is powerful for tasks that need information from different knowledge bases.
- A command links to many Spaces; a Space links to many commands.
- One linked Space can be set as the default. When set, that Space is used for quick execution without prompting you to pick one.
- Per-command data mode override: a command can override a Space's default data mode (raw vs. compact) to trade fidelity for token savings on a per-command basis. See Smart Compaction & Data Modes.
Assigning multiple Spaces
- Open the command in Edit mode.
- In the Space section, add additional Spaces.
- Mark one as the default if you want quick execution to skip the Space picker.
Append Fixed Content
A command can carry fixed content to append (max 5,000 chars). This text is added to the result only at delivery time (clipboard copy or text replacement) — it is not sent to the AI and is not recorded in History. Example: a signature line like — Processed by Rephlo.
Hide from the Overlay Menu
If you have commands you rarely trigger from the quick-access overlay but don't want to delete:
- Right-click the command → Hide from Menu.
- The command stays fully executable from the Dashboard but no longer appears in the context-menu overlay.
To reverse it: right-click → Show in Menu.
Context Menu Actions
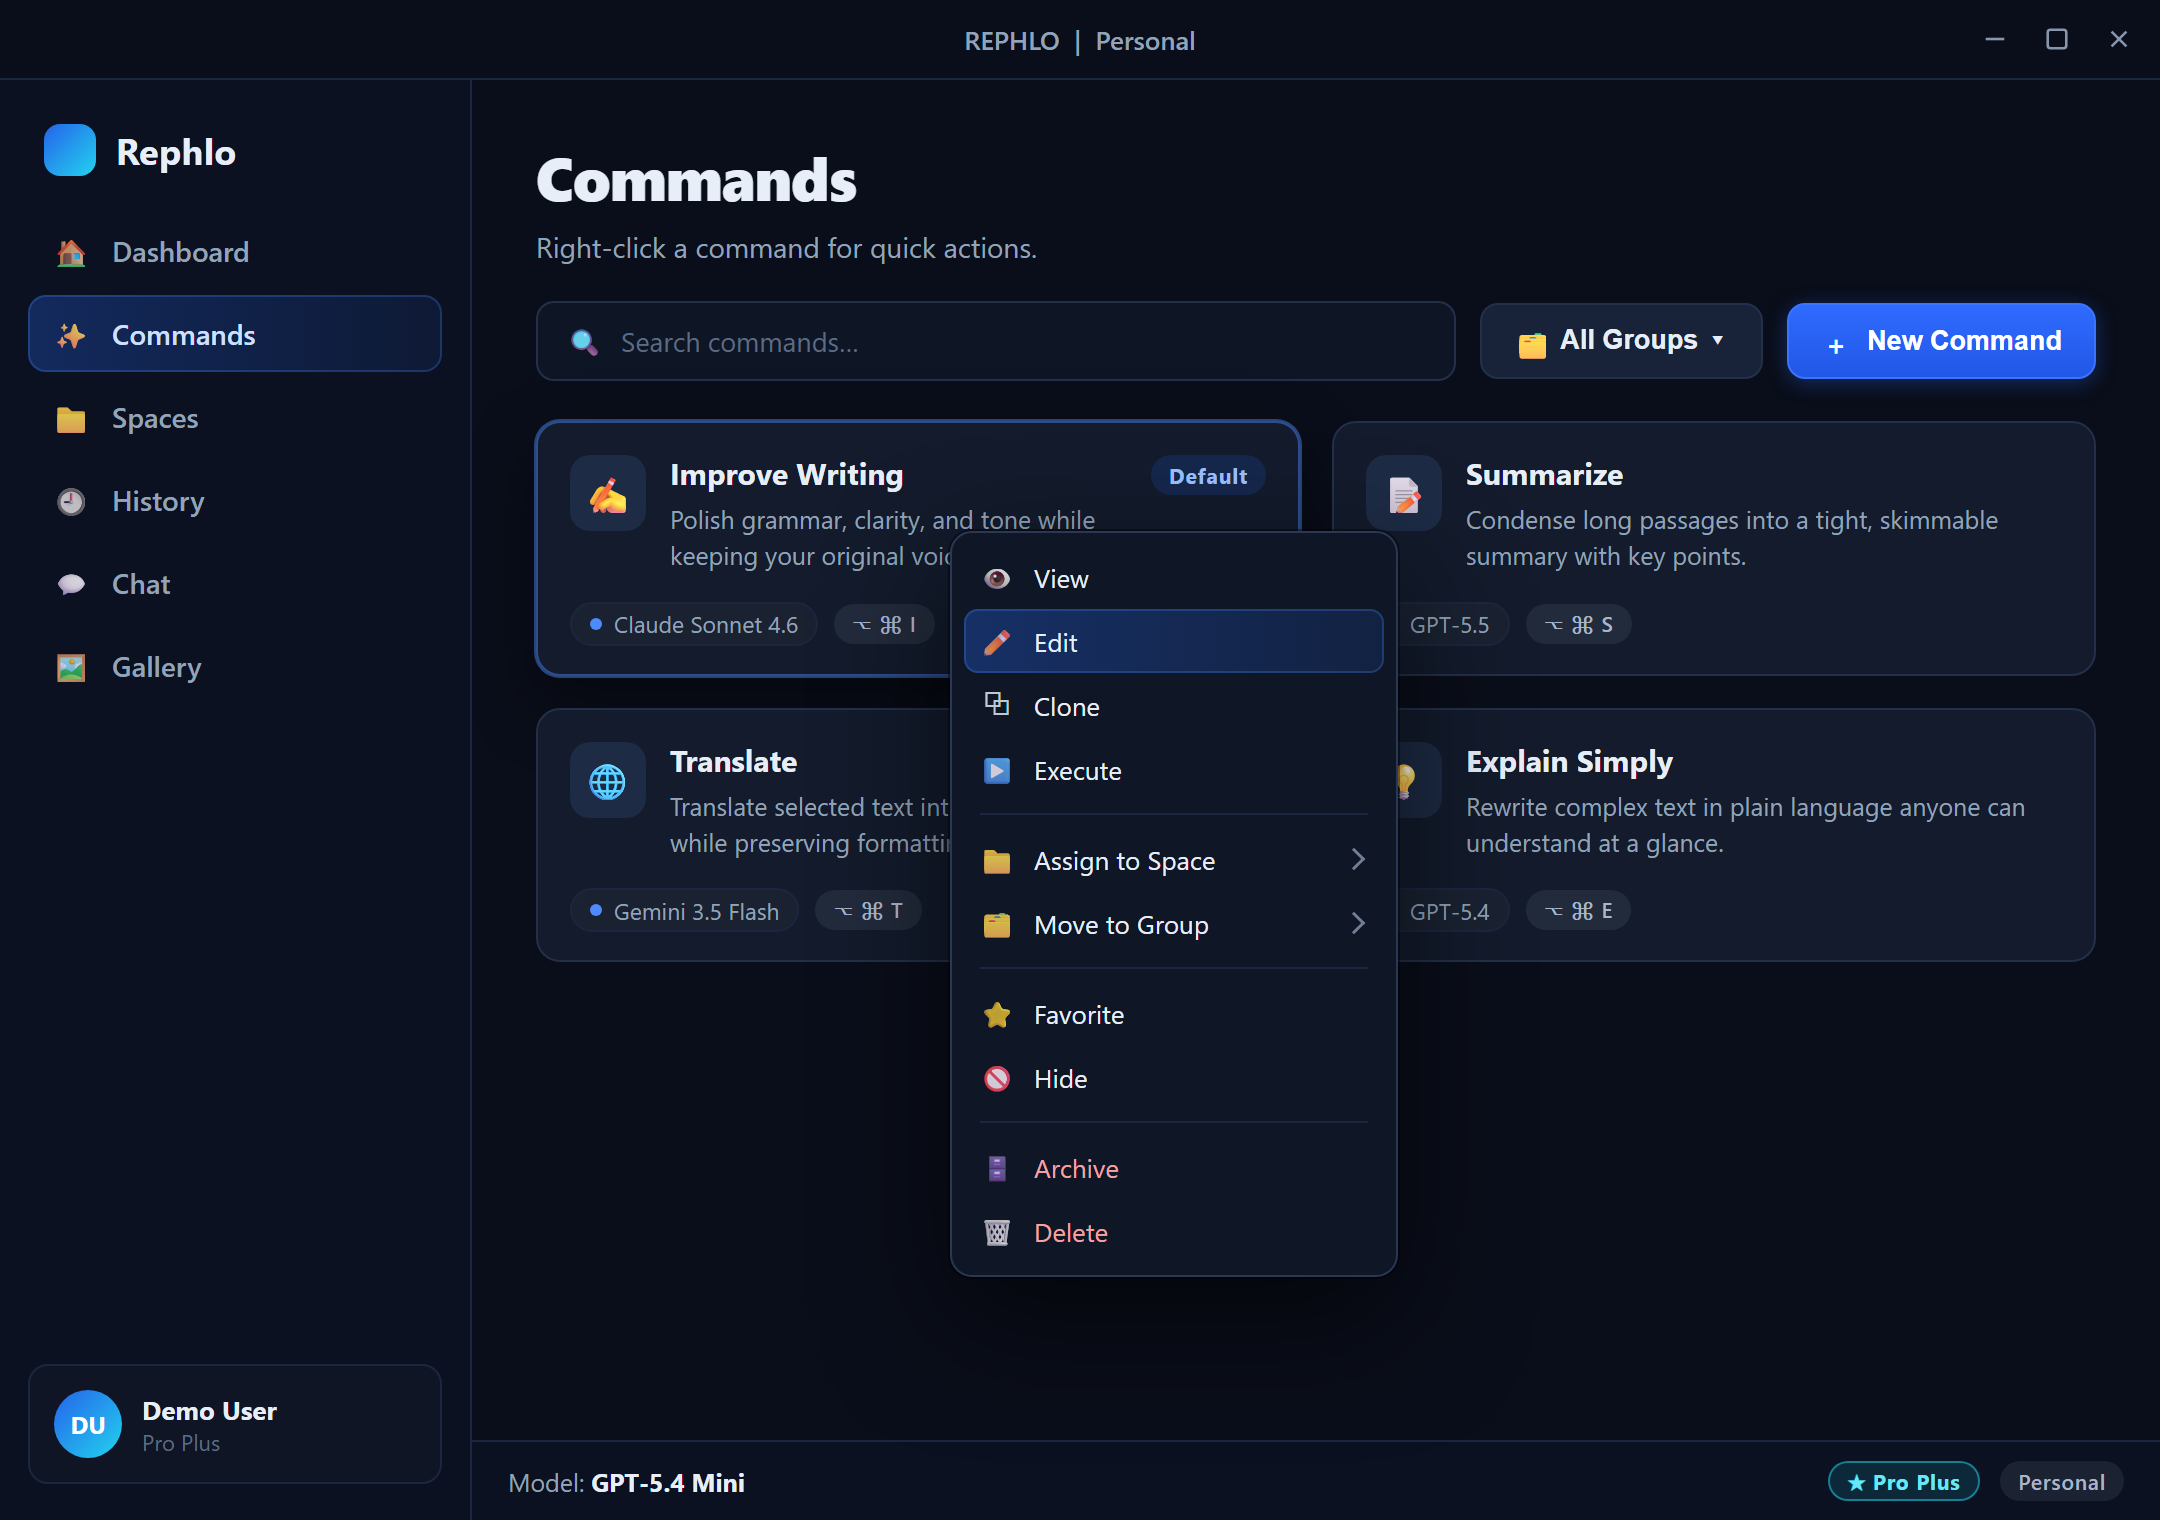
Right-click any command for quick actions:
| Action | Description |
|---|---|
| View Details | Open the command read-only |
| Edit | Open the command in edit mode |
| Clone | Create an ungrouped copy |
| Execute | Run the command immediately |
| Assign to Space | Link the command to one or more Spaces |
| Move to Group | Organize into a Command Group |
| Toggle Favorite | Add/remove from favorites |
| Hide from Menu | Remove from the quick-access overlay |
| Archive | Soft-delete (recoverable) |
| Delete | Permanently remove (after archive) |
Organizing with Groups
Command Groups are emoji-labeled folders for related commands. Commands carry a sort position within their group so you can reorder them by drag-and-drop. Commands without a group appear in an Ungrouped section. See the dedicated Command Groups page for the full workflow.
Archiving and Deleting
Deletion is a two-step, soft-delete workflow so you don't lose work by accident:
- Archive — hides the command from the main list and the context menu, but preserves it (and records when it was archived). Archived commands can be restored.
- Delete — permanently removes a command. A command must be archived before it can be permanently deleted.
Export & Import Commands
Commands can be exported to JSON for backup, sharing, or migration. See Import & Export for full details.
Quick export:
- Select commands with the checkboxes.
- Click Export/Import → Export Selected.
- Save the
.jsonfile.
Quick import:
- Click Export/Import → Import Commands.
- Choose a
.jsonfile. - Pick how to handle duplicates (Skip, Replace, or Rename).
You can also install commands directly from the web gallery via deep links — see Web Install & Deep Links.
Next: Organize your library with Command Groups, or learn how to feed the AI context with Managing Spaces.